

99% Of Substack Profiles Suck, Here's How To Become Part Of The 1%
optimize your name, picture and description with this full masterclass

Howdy, Wealth Gang🤠

If you are serious about growing on Substack, there are a few non-negotiable things to set up.
One of them is 100% your profile.
It’s the main gateway to bring a reader to your content, and if your entrance hall already looks like an old, shabby back-door garage, every single visitor will do a 180 and get out of your Substack profile before even seeing what you have to offer.
That’s why I created The Perfect Substack Profile Trilogy.
It’s a 3-part series where we fix every part of your profile from the ground up.
1. Name
2. Picture
3. Description
Today, I give you the full trilogy in one shot, + some extra infographics as a bonus. :)
By the end, your profile will be optimized to make sure all your visitors will become loyal subscribers. :)
Now, we start with…
Part 1: Your Perfect Substack Profile Name

You will learn:
✓ Why your Substack profile name and your publication name are two completely different things (and why mixing them up is costing you trust)
✓ The difference between your Name and your Handle and exactly what to put in each field
✓ Why your profile name is the internal Substack SEO nobody talks about and how to make sure people can actually find you
Your name sounds like the easiest thing to get right.
Well… It isn’t. ;)

Your Substack Profile Is You, NOT Your Publication
First, we have to get clear about one thing.
On Substack, you have two different types of “identities.”
1. Your Publication
That’s your newsletter. It has its own name, its own page, its own branding. “Write Your Way To Wealth” is my publication name for example.
2. Your Profile
It’s your personal identity on the platform. The name that shows up when you comment, when you get mentioned, or when someone searches for you.
Mine is Timo Mason🤠.
They are not the same thing, but creators constantly treat them like they are.
They put their newsletter name in their personal profile name field and wonder why they are not able to build an engaged audience
When your profile name says “NewsletterGrowthHQ” instead of your actual name, you don’t look like a person anymore.
You look like a brand account and people don’t connect with random brands.
The second your profile stops feeling like a real person, you lose trust before you even open your mouth.
“But what if I’ve been using my newsletter name as my profile name for months?”
Change it today.
The sooner it’s right, the sooner people trust you.
If you are afraid that some people might be confused, send out a quick mail to your audience and tell them about the update you made.

Keep the newsletter name for your publication, and your profile name for you.
Just Use Your Name (But Read This First)
There’s something worth knowing before you type in your name.
When you open your Substack profile settings, you’ll notice two separate fields.
Name and Handle.

The Handle
Your handle is how people find you and mention you on Substack.
When someone tags you in a comment or a note, they’re using your handle.
Keep it clean.
No emojis, no special characters, just your name in plain text.
Mine is simply timomason
The Name
This is where you have a little room to play.
Your name field is what displays publicly next to your profile picture. It’s what people actually see.
This is where you can add something that makes you visually distinct, like an emoji or symbol, something tied to your brand.
Mine is Timo Mason🤠
That cowboy emoji is part of my brand. And here’s the thing… whenever I get mentioned anywhere on Substack, I stand out immediately. The emoji makes me impossible to miss. :D
It’s a small detail that adds up to real recognition over time.
“But wait… do I have to use my actual legal name?”
Nope.
Timo Mason isn’t even my real name. You don’t need your exact legal name, just something that sounds like a real human being and is easy to find.
So pick your name, keep the handle clean, and add something small to the display name if it fits your brand.
Your Profile Name Is The “SEO” Nobody Tells You
I once tried to find the Substack profile of a client and when I put her name in the Substack search bar, nothing came out, like she… didn’t exist.
She was daily on the platform, but her profile name wasn’t her personal name, so Substack Search was like: 🤷♂️
Now think about what that means for you.
A potential collaborator heard your name somewhere or a reader from another platform wants to follow you on Substack.
They search your name, and if that’s not aligned with your internal Substack name they won’t find you.
Your profile name is your internal Substack SEO, and unlike Google, there’s no algorithm to game, you either have your name there or you don’t.
The 30-Second Fix
Please don’t just read and think “cool, I fix that someday” do the following right now while you are reading this article.
Go to your Substack profile settings.
You’ll see two fields:
1. Name
Put your real (or “could be real”) name here. Add an emoji or something on-brand if it fits.
2. Handle
What people use to find and tag you. Use the name you put into the first field without any extras.
That’s it, thirty seconds and your profile name is optimized for growth and trust.
Part 2: Your Perfect Substack Profile Picture

Your profile picture is doing more work (or damage in some cases) than you think, so let’s make sure it’s set up perfectly. :)
By the end of part 2 you will know:
✓ The 3 Ways You Lose Trust Through Your Profile Picture
✓ The 3 Rules Of A Perfect Profile Picture
✓ The 4-Step Action Guide To Fix Your Profile Picture In 40 Seconds
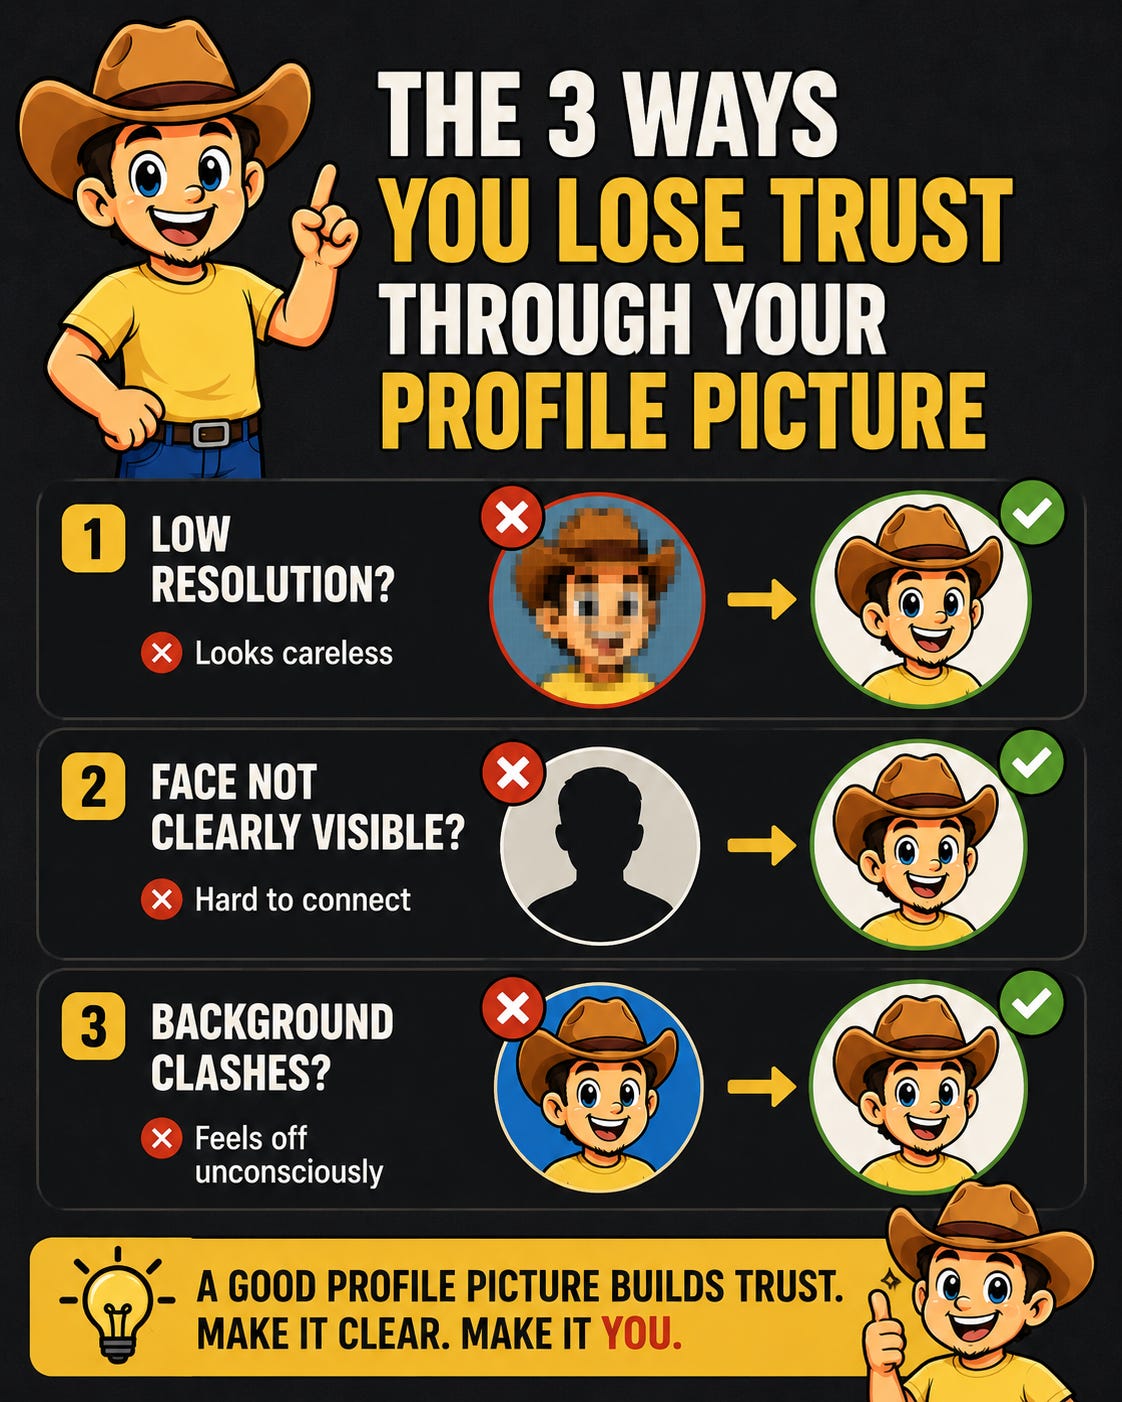
The 3 Ways You Lose Trust Through Your Profile Picture
Most creators pour hours into their writing and then slap a 240p selfie from 2019 as their profile picture.
Or worse… they leave the default avatar in there.
A bad profile picture sends signals you don’t even realize you’re sending.
1. Low resolution?
Tells visitors of your profile you don’t pay attention to details.
2. Face not clearly visible?
Readers can’t connect with a silhouette. Humans are wired to look at faces and if yours isn’t clear, they move on.
3. Background color that clashes with your publication’s color scheme?
This one is sneaky.
Nobody’s going to consciously think: “hmm, that blue background doesn’t match their black and white newsletter.” But unconsciously, they’ll feel like something is off. The branding feels random and their trust drops without them knowing why.
The 3 Rules Of A Perfect Profile Picture
Rule 1: Show Your Face. Clearly.
Substack is a personal publishing platform. People subscribe to 👉you👈.
Displaying a random logo instead of your face as a PP creates distance from the start.
And when I say clearly, I mean it. Cropped tight enough that your face takes up most of the frame. Not a full-body shot where you’re a tiny figure in the distance.
If someone has to zoom in to see you, you’ve already lost them.
“But what if I don’t want to show my real face?”
A high-quality illustration or a consistent character that represents you works, as long as it’s intentional, recognizable, and consistent across your whole profile.
Best example Finn Tropy.
Rule 2: Match Your Colors
Your profile picture doesn’t exist in isolation.
It sits next to your banner and publication. If everything in your Substack is black and white, but your profile picture has a random bright orange background, people feel the misalignment.
The fix is to simply use your publication colors as your profile pic background.
“But i’m not a designer, I have no idea how to do that.”
Don’t worry, in the next section I’ll show you a free tool that lets you set this up in 40 seconds.
(No design skills required)
Rule 3: Your Face Expression Is Your Brand Energy
This one’s personal.
My mentor once told me to change my profile picture. Said I looked unprofessional, smiling with a missing tooth.

I told him no.
Looking professional is genuinely not my vibe.
My brand is positive, warm, and I don’t take myself too seriously. My gap-toothed smile is the brand. If I swap it for a stiff corporate headshot, I become someone I’m not and the people I actually want to attract won’t feel it.
Your face expression should match your energy.
Warm and approachable? Smile like you mean it.
Serious and authoritative? Look the part.
Weird and funny? Let it show.
The 4-Step Action Guide To Fix Your Profile Picture In 40 Seconds
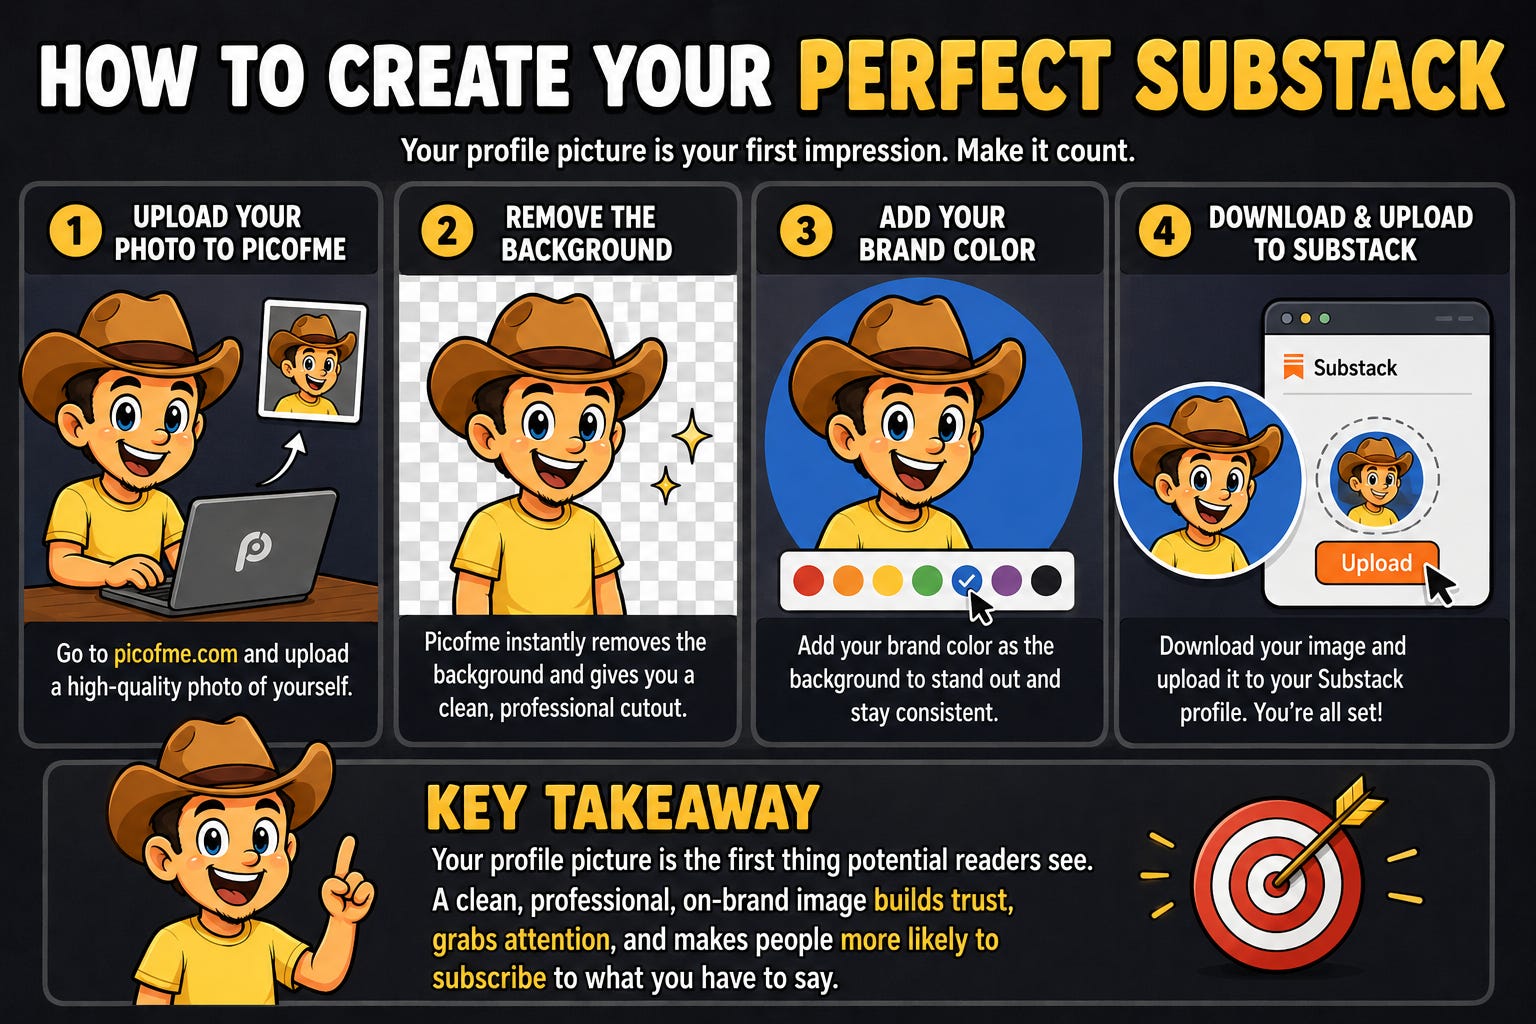
Go to picofme.io (It’s free, there are no ads, and you don’t need to create an account.)
Step 1: Upload your photo
Any decent photo of your face works. Good lighting helps and make sure you’ve got the matching facial expression we talked about.
Step 2: Let AI remove your background
One click and AI cuts you out cleanly and you’re left with just your face, ready to drop onto any background you desire.
Step 3: Set your brand color as the background
Now the AI will give you a bunch of versions you can scroll through.
Choose one that feels right to you then click on “customize” to nail down the details.
There you can click on “background” and add the exact color code of your publication as your background.
If you’re not sure what the color code is, you can go to your Substack settings where you find the “Website editor” and there you will find the section “Colors” with the exact color codes that are used in your publication.

Step 4: Download and upload to Substack
Click on “Download” open up your Substack profile settings and upload it there. :)
I recorded the whole 4-step process so you can just follow along, I did it in 40 seconds flat:
Now you got a clean, professional profile picture that actually fits your brand. :D
Takeaway
Your profile picture is the first thing people see before they decide if you’re worth their time.
Get your face in there. Match your brand color. Let your expression do the talking.
And if you’re sitting there with a blurry selfie or a 👤default avatar👤 right now, you’ve got everything you need to fix it in the next 40 seconds.
Go to picofme.io, follow the steps above, and get it done today.
P.S. I have no type of affiliation with picofme.io / It’s just a really cool tool. :)

Part 3: Your Perfect Substack Profile Description

Someone lands on your Substack profile for the first time.
They see your name and your face.
Glance at it and nod along.
The question still running in their head:
“Is this for me? Should I care about this Substack guy / girl / nonbinary person, or not?”
So they take a peek at your profile description…
It has one shot to dissolve the question mark present in their brain.
If it answers their question with confidence and clarity… great, you’ve got a new subscriber! :D
If it’s confusing, vague, or written like a poem, the default answer is… “no, thank you”, they just click away never to be seen again.
In Part 3, you will learn:
✓ The 4 Questions Your Description Has To Answer
✓ The Perfect Profile Description Framework (+ Prompt)
✓ 4 Examples Of Successful Profile Bios (Feat: Jess, The Creator, Yana G.Y., Anfernee)
✓ Bonus: Why Adding Multiple Links Below Your Bio Is Killing Your Subscriber Rate
Let’s goo! 🤠
The 4 Questions Your Description Has To Answer
When a stranger lands on your profile, their brain runs a quick checklist.
Not consciously, just instinctively.
The order of that checklist matters. A lot. Answer them out of sequence and you lose people before they even read your content.
Question 1: Is this for me?
If they can’t see themselves in your description within two seconds, they’re gone.
Question 2: Why should I care?
Okay, so it’s for them. Now what?
This is where you give them the result they actually want.
NOT what you do… what they get.
Question 3: How are you going to give me that result?
Now they’re interested.
This is where your skill or method comes in.
It’s the “with [method]” part of your bio.
It tells them you have a specific way of delivering the result, not just vibes.
Question 4: Why should I listen to you specifically?
Optional, only add this if you have space left after the first three. I don’t, so I skipped it. No big deal.
This is your social proof. Something that makes them think “okay, this person knows what they’re talking about.”
Your bio needs to answer these four questions in order, in as few words as possible.
And I’m about to show you the exact framework that packs all of them into one punchy, converting sentence.
The Perfect Profile Description Framework (+Prompt)
Here’s the formula:
“I help [Target Audience] achieve [Result] with [Skill or Method] / Social Proof.”
Four parts, in One (and a half) sentences.
Important to answers the first three questions in the right order.
Nobody cares about your method, if they dont know if its for them at all.
Build your version manually, or use this prompt to get a good draft from AI:
“Help me write a one-line bio. I help [Insert Target Audience] achieve [Insert Dream Result] with [Insert Skill or Method].
Give me 3 clear options under 120 characters. Make them sharp, confident, and authentic.”
Plug in your details, run it, and you’ll have three solid options in seconds.
If you want AI to not just write your bio but your full Substack articles too, the Article Architect handles the whole process, from outline to finished draft.
Now let me show you how four real Substack creators use their own version of it, so you can see how flexible and universal this framework is.
4 Examples Of Successful Profile Bios
Timo Mason🤠 — Target Persona + Dream Result In One
“I help you escape the 9–5 hell by growing and monetizing your Substack Personal brand. Subscribe now and get the Substack Side-Hustle Sprint FOR FREE!👇”
Instead of naming a specific audience, I say “you“ cause I like the direct, personal touch, the dream result “escape the 9–5 hell“ does the targeting automatically, if that line resonates, you’re the right person.
The method follows “growing and monetizing your Substack personal brand”, and the remaining space goes to a freebie CTA instead of social proof.
Jess, The Creator — Personality-First Variation
“Who am I? The Best Writer Alive 💥 I’m Jessica—a nurse practitioner turned trader and multi-publication Substack builder helping creators launch correctly from day one.”
Jess leads with personality and confidence.
The target audience is writing-based creators, the result is launching correctly, and she implies her credibility through “multi-publication builder”.
It’s a character-driven take on the framework.
Yana G.Y. — The Authority-Heavy Variation
“Helping you grow a high-converting Substack with AI & Automations | Product, Sales & Marketing Leader | Mentor | Member & Chartered Marketer@CIM”
Yana leads straight with the result “grow a high-converting Substack” and the method “AI & Automations” then stacks her credentials as social proof.
Pure framework, authority-heavy finish.
Anfernee — The Social Proof Variation
“🤝 Helping 35,000+ solopreneurs get more done & earn more ⭐️ Creator of First Digital Dollar Project 🗄️ Get Solopreneur Success Hub FREE👇”
Anfernee bakes social proof directly into the target audience line “35,000+ solopreneurs”.
The result is clear (get more done, earn more), and he closes with a freebie CTA.
All 4 have the same idea, answering the questions every new profile visitor has subconsciously in their mind, but all four find unique ways to answer them.
Bonus: Why Adding Multiple Links Below Your Bio Is Killing Your Subscriber Rate
Before we wrap up, a quick bonus that ties into your profile as a whole.
Substack lets you add multiple links below your bio.

It’s tempting… More links means more visibility, right?
Wrong.
Every link you add is an exit door.
Someone lands on your profile, reads your bio, and thinks “okay, this looks interesting.” Then they see your Instagram link and clicks it.
Now they’re scrolling your Instagram, then they see a post, click a hashtag, and 20 minutes later they’re watching a stranger’s travel reel.
You lost them.
☝️The goal of your Substack profile is one thing ONLY… Turn a visitor into a subscriber.☝️
So keep one link. Your publication.
But I also want to share my website and other socials on Substack?🥺
Yes, don’t worry that’s what your Substack Publication website is for. :)
Put them into your about page and your website footer.
The 5 Profile Lessons
Your Substack profile is a conversion machine, but only if every piece does its job.
Your name and profile picture indicate you are a real person, and your description answers their question: “Why should I care about this person?”
Get that answer right and they subscribe, get it wrong or leave it vague and they’re gone faster then you can say “Substack” ;)
5 lessons from part 3:
Lead with “who you are writing for”.
Make them feel seen in the first line.Give them the result they actually want.
Not what you do, what they want to achieve.Tell them how you will help them get the result.
Just mentioning your skill or method adds credibility.Add social proof of any kind if you have the space for it.
This makes clear why they should listen to specifically YOU.Only link to your Substack publication below your description.
Keep them inside Substack network, to have the best visitor-to-subscriber rate
Final Words
Sooo… that wraps up the Perfect Substack Profile Trilogy. :D
Tell me in the comments what the next masterclass should be about, and your wish will be my command.
All 100% for free, of course, cause here on Write Your Way To Wealth we don’t gatekeep any value behind paywalls. :)
If you found the Perfect Substack Profile Trilogy helpful, you’ll love the Substack Side-Hustle Sprint, a free 5-day masterclass I created to take you from Substack newbie to having the foundation of a $2K/month newsletter that replaces your 9-5.
Subscribe to Write Your Way To Wealth and get the Substack Side-Hustle Sprint for free.
See ya soon
Timo Mason🤠
Liked this post? 2 ways you can support me
Share it with a creator friend who will benefit.
Ask a question or share your thoughts in the comments.
Good one!